Roofing 202
Windermere Presentation
Roofing Information and Terminology For Real Estate Agents
(Based on a presentation by Jake Stout, Owner, Stout Roofing, to
Windermere agents at Windermere’s Kirkland Office)
Hopefully useful to homeowners as well!
Introduction
A few years ago I was asked to give a talk to a group of real estate agents at the Windermere Kirkland office. It was my first experience in public speaking (we roofers don’t do a lot of that) and I was scared to death.
I made an outline, practiced as best I could, and changed my shirt right before the presentation. As I began, and the agents started asking questions, I was amazed at how interested and engaged they were. They not only wanted information for their clients, but also for themselves. They asked many great questions.
What was supposed to be an hour long presentation turned into 2 hours. Not a single agent left. I survived and felt like I had helped some of them get up-to-speed on roofing considerations their clients might have to face. The roof is a big deal. It’s one of the biggest expenses a homeowner might face and it has the potential to disrupt a real estate transaction if the roof’s condition is not addressed early.
I decided this information would also be useful to Stout Roofing prospective clients as well, so I have created Roofing 202 in the hopes it will give them some objective information to help them ask the right questions and choose us. We do not believe in high pressure sales tactics or upselling. We simply give you the right information based on your needs and situation. We know exactly where our pricing is compared to our competition, and because we are mid-sized with reasonable overhead, we can compete with any company with the same experience.
It’s simple. This is our song and dance: 425-643-0888
We have had the same number for 40 years. We handle call-backs as well as new leads through the same number. If you need us we are here. – Jake Stout
ROOFING TERMINOLOGY
“Square” = 100 square feet of roofing surface area (10 ft x 10 ft). When a roof is said to be about 35 Squares, it usually refers to all of the roofing materials required to do the job including main field shingles, starter shingles, hip and ridge shingles, and waste. A rambler with a floor square footage of 2800 might require 32 squares depending upon the overhangs and the pitch of the roof.
“Bundle” The number of packages of roofing material it takes to cover a 10 ft 10 ft square (100 square feet). Three tab shingles have 3 bundles per square. Dimensional shingles require between 3 and 4 bundles per square and the heavy Presidential shingles consist of 5-6.
Cedar shakes and shingles are packaged at 5 bundles per square at the standard exposures ( 10″ for shakes, 5″ for cedar shingles.
“Pitch” The steepness of a roof is called the pitch and refers to the ratio of a roof’s vertical rise in inches to each foot (12 inches) of horizontal run. A roof with a pitch of 4/12 will rise 4″ vertically for every 12″ of horizontal distance. A 12/12 pitch is a 45 degree slope.
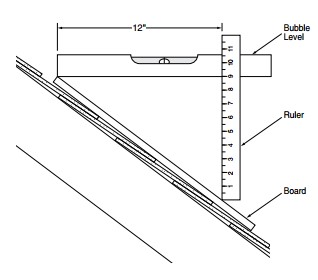
“Courses” On pitched roofs, materials are installed horizontally. Each line of roofing material is called a course.
“Exposure” The amount of roofing material on each shingle or shake exposed to the weather. A composition shingle typically has a 5 5/8” exposure while cedar shakes have a 10” exposure.
TYPES OF ROOFS
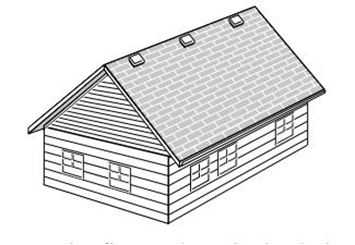
Like a lot of Buchan and Burnstead homes
Very steep sides which require additional fasteners
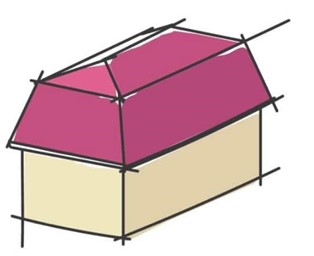
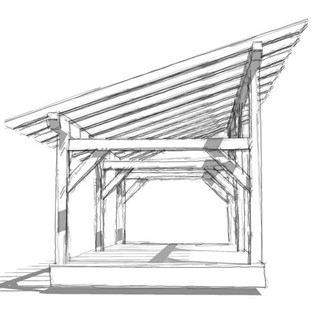
Like barn roofs or Dutch Colonials
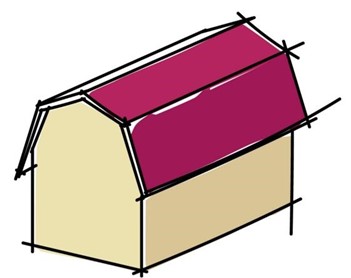
COMPONENTS OF THE ROOF STRUCTURE/FRAMING
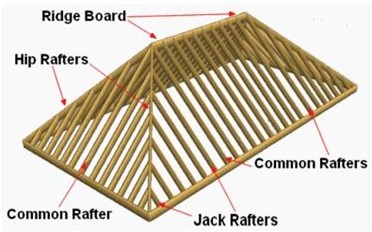
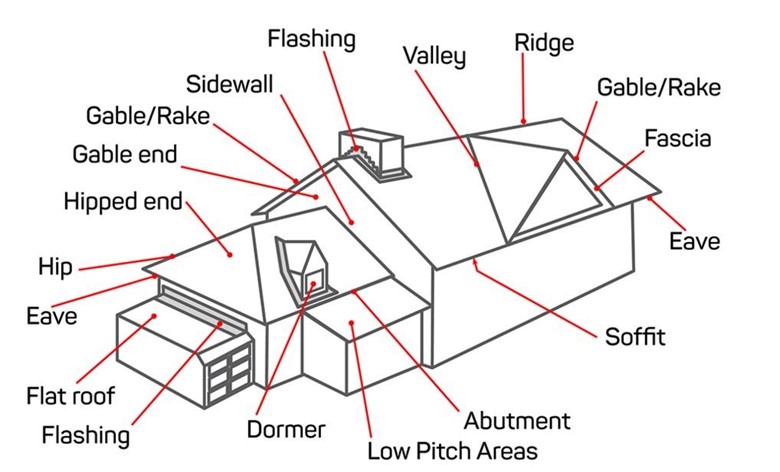
- Ridge – The highest horizontal portion of the roof.
- Gables – the end of the house where the edge of the roof goes straight up from the gutter to the ridge
- Rafters – can be on 24″ or 16″ centers. Rafters vary from 2x4s up to 2x10s.
- Valleys – where two slopes meet.
- Chimney – you should probably know what this is.
- Hips – the roofline which slopes up toward the ridge at an angle.
- (From an outside corner up to the peak.)
- Fascia – the trim wood (usually 1×6 or 1×8) behind the gutters
- Eaves – The area of the roof which extends out beyond the walls.
- Soffits – the area beneath the eaves, behind the gutters. Soffit vents allow cooler air to flow into the attic and then out through ridge vents. Soffits can be open or enclosed.
- Built-In gutters – gutters which are enclosed in the eaves and are lined with torch down, PVC, TPO or hot tar. The drains are either 2” or 3” diameters and are known as “Scuppers”
COMPONENTS OF THE ROOF STRUCTURE/FRAMING
Decking or sheathing – Options: shiplap, skip sheathing with 1×4’s, plywood or OSB.
Shiplap – Older roofs were often framed with 1×6 shiplap decking. Often times the boards were first used for the foundation forms and then transferred and used on the roof deck. These are usually pretty solid and easy to replace.
Skip sheathing – Usually 1×4 boards spaced every 4″. These are common on all cedar shake and shingle roofs. Since cedar was abundant in the Northwest in the early 1900’s, almost all roofs were made of shingles or shakes. As newer composition roofs came into being, they were often installed directly over the cedar shingles after cutting back the eaves and installing a 1×4 trim board around the perimeter so you couldn’t tell there were 2 roofs. In Seattle, there are still many roofs with 2 layers of composition over the original cedar shingle roof. Today, all these layers are torn off and plywood is installed on top of the 1×4’s before composition can be installed. Cedar shakes or shingles can be installed over the 1×4’s without the need for additional plywood.
½” CDX Plywood – CDX refers to exterior grade plywood made specifically for roofing. It comes in 2 common thicknesses for re-roofing. 1/2″ and 3/8″. In the past, roof decking installed with 3/8″ plywood on 24″ rafters would require metal clips between the panels to give them added support. Now, 1/2″ CDX is the norm and is required by most shingle manufacturers for their heavier shingles. Most residential re-roofers will bid with 1/2″ CDX.
OSB – 7/16″ Oriented Strand Board is less expensive than CDX and is very common on new construction homes. In the past, it had a tendency to flake and expand at the edges if exposed to moisture. About 12 years ago I called a rep at Plywood Supply (a main Puget Sound wholesaler in Kenmore) and asked what the problems were with OSB. He mentioned that since those initial troubles, they have changed the glues and the OSB is fine, and that structurally, it is just as strong as plywood. We offer OSB as an option to save money if the situation is appropriate. We are still biased toward plywood.
UNDERLAYMENTS
There are several reasons for the Underlayment (commonly known as Tar or Felt paper):
- When a house is being built, the installation of the tar paper makes the home water-tight so contractors can begin work on the interior without having to install the roof.
- The paper serves as back up protection if the shingles fail from wind driven rain.
- It keeps the house water-tight during the tear-off process.
- It hides minor imperfections in the roof decking and creates a smooth surface.
- Finally, it can increase the Fire Rating to Class A for some materials.
TAR PAPER – Comes in two weights – 15 lb vs. 30 lb.
These two styles also vary in quality. Paper which is designated ASTM is heavier in both the 15 and 30 lb versions. Most manufacturers require the heavier paper as part of their warranty requirements for the higher-end shingles.
Stout Roofing has used 30 lb paper for years for all our roofs. In recent years we have migrated to the newer synthetic underlayments which are lighter and stronger at the same price level.
Some common underlayments are Safeguard 30, Tri-Built, GAF DeckArmor, Certainteed Diamond Deck, Owens Corning ProArmor and Malarkey Secure Start Plus.
ICE and WATER SHIELD
In recent years, manufacturers have introduced Ice and Water shield membranes.
These underlayments feel like thin rubber and are applied directly to the plywood with a “peel and stick” backing. They are waterproof and the material seals the nails and fasteners used to install the roofing. This is usually required on low slope roofs which are from 2/12 – 4/12 pitch in order to maintain the shingle warranty. We are now using it in the valleys, around plumbing pipes, chimneys and skylights, and along the eaves to prevent problems with ice dams. In the Puget Sound area, ice dams along the eaves seem to be a more frequent problem with our changing weather, so it’s an option to consider even if you are at sea level.
ROOF FLASHINGS
Step flashing– Goes up the sides of chimneys, skylights, and dormers. Metal flashing goes up under the siding or counterflashing about 4″ and under each course of shingles or shakes. It should be replaced whenever possible.
Drip Edge – Installed along the gable ends, this metal is used to cover the exposed edge of the plywood or OSB.
1×3 Starter Metal: – Used along the gutter eave of the roof where the sheathing hangs into the gutter. Prevents wind driven rain from hitting the edge of the wood and trims the edge out nicely. The edge is hemmed so the owner can clean the gutters without getting their hands cut.
Saddle or Pan metal – Usually 5″x13″ metal which sits behind the chimney or skylights.
Roof-to-Wall flashing – Metal which goes up under the siding and out over the shingles where the roof meets a wall. (Like at the bottom of a dormer or the bottom of chimneys or skylights.) Sometimes we cannot replace it without damaging the siding. If so, we can install new metal under the existing and wire brush it and paint it. Or we reside the section at additional cost.
Counter Flashings – This is the metal flashing on a brick chimney which is mortared in between the bricks and folds down over all the other flashings at the base of the chimney. It will usually outlast the roofing shingles, and if painted regularly can last many decades. If it is rusted and in poor condition, it needs to be replaced. Sometimes if it only has surface rust it can be scraped and painted with Rustoleum Paint.
Plumbing Pipe flashings – These are the flashings which slide down over the plumbing pipes on the roof. They come in 3 versions: All rubber, galvanized metal with a rubber boot, and all lead. We use the lead flashings with lead caps on all our roofs. We never use the all rubber or plastic ones.In my experience, these crack and fail at about 18 years.
Valleys – For composition, there are 3 types of valleys:
- Woven – Where the shingles are interwoven from one side to the other up the valley.
- Closed Valleys – Where all the shingles on one side come through the valley and up the other side about a foot. The next side of shingles comes across the middle of the valley and is cut in a straight line up the valley.
- W Metal Valleys – All metal 14″ wide on each side on the valley, 26 gauge, brown or black baked enamel. We use this type of valley on all roofs from 3 tab to Presidential and cedar shakes. Great looking and we never have any valley problems.
VENTILATION
Proper airflow in the attic space will prevent condensation from developing and rotting out the roof sheathing or plywood. It will help cool the home in the summer and prevent ice dams from building up in the winter. An integral part of the system is the insulation which should also be up to code.
The basic idea is to try to insure that the attic temperature is close to the outside temperature. It is the difference in temperatures which will cause condensation in the attic and snow melting above the eaves and then icing up at the gutters in the winter.
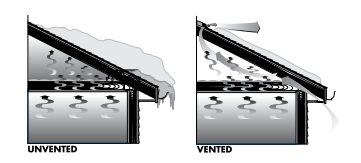
Proper ventilation requires a minimum of one square foot of ventilation per 150 Sq feet of attic floor space, although with the right combination of soffit vents and ridge vents that can be reduced to 1 Square foot of ventilation per 300 sq feet of attic space.
Traditionally, gable vents at the ends of the house provided ventilation. Roof vents also supplied ventilation by convection when placed at the top of roof just below the ridge, usually on the backside where they would be less visible.
Soffit vents help improve this airflow and are now code.
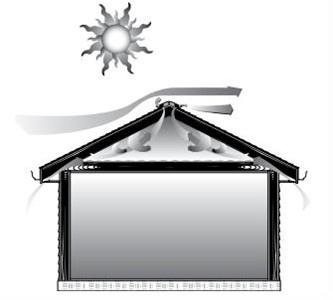
Ridge vents were initially developed to vent cathedral ceiling areas where it was not reasonable to install a roof vent every 2 feet to vent the airspace between the rafters. As they became more common and better looking, they are now the norm and are used whenever possible instead of, or in addition to, roof vents. We use ShingleVent II baffled ridge vents whenever possible.
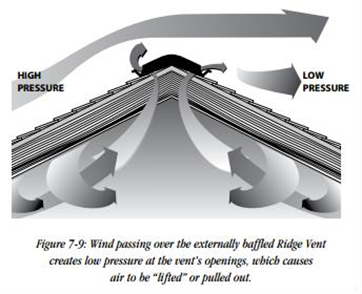
On hip roofs which sometimes have limited ridge sections, roof vents must still be installed to provide adequate outflow. We use RVO metal roof vents instead of the AF 50 plastic vents which I have seen fail with cracks appearing at the top corners after 20 years.
CONSIDERATIONS IN CHOOSING A ROOFING PRODUCT
Cost – Prices can range from about $95 per square for 3-tab shingles to over $900 or more for slate.
Weight: Concrete tile can weight as much as 1,000 lbs per square, composition shingles around 220 – 480 lbs per square, and metal roofing half the weight of composition.
Durability – Check the warranties and the track record of the material.
Fire Ratings – Ratings go from Class A, the most effective, to Class C, the least effective. Where certain localities require a minimum rating it can sometimes be possible to increase the rating by wood treatments for shake roofs, or by changing the roof sheathing and underlayment system. Most composition shingles have a Class A rating.
Homeowner Association Covenants may have specific limitations on materials and colors.
Lifespan – The main concern is that an owner should try to choose a roof material with a long enough lifespan that they don’t have to install another roof in order to sell the house in the future. It is common for lenders to require a 5 year roof certification when a house is purchased. That certification would come from a roofer who will make a subjective judgement on how long the roof will last. This is like having the wolf guard the hen house as the roofer’s preference would be to install a new roof. I tell my customers they should allow about a 10 year buffer. If they think they are going to own the house for over 20 years, they might consider upgrading from a 30 year roof to a 40 year roof so they don’t have to re-roof again.
TYPES OF ROOFING
FLAT AND LOW-SLOPE ROOFS
Hot Tar
Hot tar used to be the material of choice for flat roofs and still is on many commercial structures. Hot tar roofs are essentially built on site with layers of hot tar and fiberglass felt paper, finished off with either a smooth surface coating, a mineral surface cap sheet or gravel. All to prevent the sun from damaging the roof.
The average lifespan for a 3 ply residential hot tar and gravel roof is about 20 years. As it gets near the end of it’s life, the roof will begin to blister and alligator (show cracks) and will wear away at the corners and stress joints. On a gravel roof it is harder to detect problems and therefore not wise to certify and take on possible liability if the roof has problems. They are very difficult to repair.
Torch Down
Single ply “Torch -down” has been around about 30 years and it now has a pretty good track record. There are two general types – smooth surface and granular surface. On sloped roofs we try to use the granular surface material if the roof is visible. It doesn’t look so commercial. On dead flat roofs where standing water might be likely, we use the smooth surface so
we can overlap the seams 6 inches rather than 3″ to insure a tight joint. The smooth surface material can be coated with a KARNAK roof coating which expands and contracts with the torch-down and helps extend the roof life.
When the roof starts to show hairline cracks in the material, it is time to start considering replacement. Spot leak repairs can be made easily once the problem is isolated.
PVC and TPO
Poly Vinyl Chloride (PVC) roofing membranes are becoming more and more popular among residential roofers and seems to be a very good solution for flat and low pitch roofs. The common thickness is 60 mil. This material is similar to swimming pool liners and is the most appropriate if there are areas of standing water.
METAL ROOFS
The two most common standing seam metal roofs in the Puget Sound area are Champion Snap Lock and Nu-Ray Metals.
These roofs have a 50 year Warranty and can be installed on roofs as low as 2/12 pitch with the proper underlayment.
Metal is very time consuming to install around chimneys, valleys, and skylights. On a complicated roof design it can become very expensive. On a straight run with minimal protrusions it can be a very reasonable choice.
There are also other styles of metal shingles now available.
TILE
Tiles are most often used in new construction when the framer can build the house with the structural requirements in mind.
Re-roofing an old house with tile can often require additional framing support in the attic to accommodate the weight.
Monier Corporation offers some very good products and has an excellent reputation.
COMPOSITION SHINGLES
3 Tab Shingles
The dominant shingle used from the 1940s into the 70’s. In the late 70’s the heavier dimensional shingles were introduced and are now the most popular. When we get severe windstorms, the 3 tab shingles are usually the only ones which blow off.
Architectural/Dimensional/ Laminated Shingles
Most manufacturers have offered a 30, 40 and 50 year version of the standard dimensional style shingle. In the last few of years all the manufacturers have made all their shingles “Limited Lifetime Shingles”. This is very confusing since they didn’t change the shingles. Consequently, the easiest way to compare the shingles and their probable lifespans is by the weight of the shingle. The heavier and thicker the shingle, the longer it will last.
Tri-Laminates
Certainteed Presidential Shake shingles were developed over 30 years ago and were the first Lifetime shingle of their style – imitating cedar shakes. GAF Grand Sequoia soon followed and then other companies as well.Eventually, Certainteed began offering an even heavier “Tri Laminate” version called Presidential Shake TL. This has become the niche leader in the upper-end composition market and is often required in homeowner association covenants as a replacement for cedar shakes.
Slate Imitations – Certainteed and other manufacturers offer various shingles such as Grand Manor or Carriage house which try to imitate slate.
Older styles
Although Dutch Lap shingles, Hurricane Shingles and T- Lok Shingles lasted many more years than 3 tab, they have all but disappeared from the market due to their outdated appearance.
Traditional Cedar Shakes or Shingles
Stout Roofing has owned and operated 2 cedar shake mills in the past -one in Snohomish and another on Vancouver Island.
Here is a quick synopsis of where the cedar comes from and how the shakes are made:
Cedar shakes and shingles are made from Old Growth cedar trees, usually over 100 years old. Nowadays, the vast majority of the cedar is recovered from “Cedar Stumpage Sales” which allows contractors to go into previously logged areas and harvest old stumps and the remains left behind in the woods from logging operations years ago. Often , old trees are covered with moss and are barely undetectable. Cedar blocks are cut from the stumpage with a chain saw, and then split with a froe and a mallet into “bolts” on the spot. The “bolts” are wedge shaped blocks, 24″ high. These are tied together tightly in a sling and left on the ground. After enough bolts have been prepared, the bolt cutters schedule the “fly day.”
A helicopter is hired to airlift all the bolts out to a landing where they can be loaded onto trucks and taken to the mill where they are cut into shakes and shingles. The chopper pilot drops a long cable with a hook on the end down through the trees to each sling. The bolt cutter uses a radio to direct the pilot.
He gets to the sling, connects it to the hook, and runs as fast as he can to the next sling which could be a couple of hundred feet away, all the while telling the pilot where the next sling will be. The chopper pilot pulls the sling up through the trees trying not hit any branches. If he does, the bolts explode and hail down on the cutters below. He hits the landing where the sling is detached and then flies back to the next sling. The process is repeated all day long. At hundreds of dollars an hour for the chopper, the blockcutters have a real incentive to keep the costs down by running through the woods to minimize wait time.
When the bolts are all loaded, the pilot drops the hook down to each of the blockcutters out in the forest. They wedge one foot into the hook, hold onto the cable and are hoisted into the air through the trees, back to the landing.
That’s called “riding the hook”. At about $800-$1000 a cord before manufacturing, shipping, and delivery to a wholesaler, it’s easy to understand why shakes cost so much.
Old growth is required because those trees have very tight growth rings and are clear of knots. Second growth cedar is sometimes found in bogs, grows very fast, and has wide grains and knots making it unsuitable for roofing shakes.
Once at the mill, the bolts are placed on a conveyor which leads to the “splitter”. The splitterman lifts the bolt up onto a steel plate, pushes it against a bar which determines the width of the shake, presses a foot pedal and a steel wedge comes down into the block. He turns the block to get the most shakes per bolt. These boards are then put onto another conveyor which heads to an 8 foot tall band saw. The top and bottom wheels of the saw are about 3 1/2 feet in diameter. The blade is moving at about 3,000 rpms. The “sawyer” grabs a board, lines up one end with the blade and pushes the shake through the blade. His face is about 12 inches from the blade. As he reaches the halfway point, he reaches around behind the blade with a hand and pulls the shake the rest of the way through the bandsaw and drops it into a bin where they are sorted according to grade. This takes about 5 seconds and he does it all day long.
So, the next time you look at a cedar shake roof, consider the process behind it.
There are several different types of shakes available:
- Handsplit and Resawns which are the most common.
- Tapersawn shakes which are the same length as shakes (24”) but are cut on both sides in a flat saw – they look like large cedar shingles.
- Handsplit/Tapersplit Shakes which are split by hand with a froe and mallet. These usually require the very best cedar.
All the above shakes are also defined by their thickness as either “Mediums” or “Heavies”. Mediums are from 1/2″ – 3/4″ thick, and Heavies are 3/4″ – 1 1/2″ thick.
Red Cedar Shake Grading
Refers to the quality of the shakes. There are strict limits on the minimum number of growth rings per inch permitted by the Cedar Shake and Shingle Bureau which inspects shake mills. There are also limitations on the amount of vertical grain vs. flat grain allowed, minimum limits on width, and the amount and location of knots.
For roofing, the minimum grade of cedar is known as a “No. 1 Grade” which in the US allows for up to 20% flat grain and no knots. “Premium” shakes have 100% vertical or edge grain and are the highest quality.
All shakes and shingles can be pressure treated (similar to Osmose or Wolmanized pressure treated lumber) which gives them warranties up to 30 years.
For re-roofing purposes, almost all shakes we install now are 24″, Premium quality, 100% edge grain, and are pressure-treated. These are the shakes which have the highest level of consistent quality and will last the longest.
Exposure can vary on 24″ shakes from 7 1/2″ to 10″ (the standard).
Cedar Shingles
Cedar shingles are produced on a horizontal “flatsaw” and are cut on both sides. They come in 18″ and 16″ lengths. The 18″ shingles are know as “Perfections”. They also have strict limitations on quality and can be pressure treated as well.
For Real Estate Agents
When you list a house…
- Start early. The roof is a big-ticket item which can be a game-changer. If it’s a problem you want to either take it off the table by re-roofing or repairing it, or at least anticipate the worst case scenario and be ready for it.
- Try to determine the age of the roof or the house if it’s fairly new. That is your baseline. See if you have any reports or contracts which can support the age of the roof.
- Find out what the roofing material is. Are there any documents available regarding re-roofing? Try and compare it to what you now know.
- Take a look around the neighborhood. A potential buyer will do just that. Regardless of all the documentation your seller may have and maintenance work he has performed, if half of the homes have new roofs the buyer is going to assume this one will also need to be replaced fairly soon as well. Anticipate his perspective.
- Don’t always believe what your client tells you about the roof. Get the facts and then approach them with the reality about their options. Try to get them to consider how they would feel about this roof if they were buying this home.
- When in doubt, get an expert to take a look at it. It might be cheap insurance.
All roofing problems can be resolved fairly and effectively if addressed early.
For more information:
Review “Roofing Issues for Buyers and Sellers“
